Be Our Guest!!!

This party has to be THE most magical party I have ever styled! When I first met Alexa’s mom she told me that I could get as creative as I wanted. This was like a dream because I could imagine and design anything I wanted and it would come true! It was so much fun to really study the movie (Beauty and the Beast) for inspiration and think of all the fun details that could be incorporated into the party. I was sure this 2 year old, would have the most magical time.

As always, I enlisted my amazing vendors to help me out with ideas of their individual crafts and how they could fit into my design. I definitely knew while designing that the whole event needed to flow like the movie. From the West Wing to the quaint village, the event had to emulate the storyline the Princess followed.

To set the tone, guests were invited to the party by a prince holding a handmade paper flower along with a royal invitation (Check them out here). The mood was set, and the guests were excited!

As children arrived to the residence, they were greeted with two attendants handing out princess or pirate balloons. As they each received their balloons they made their way through the grand entrance and into the West Wing. Once guests dropped off their gifts for Princess Alexa they proceeded into the village right outside the doors.

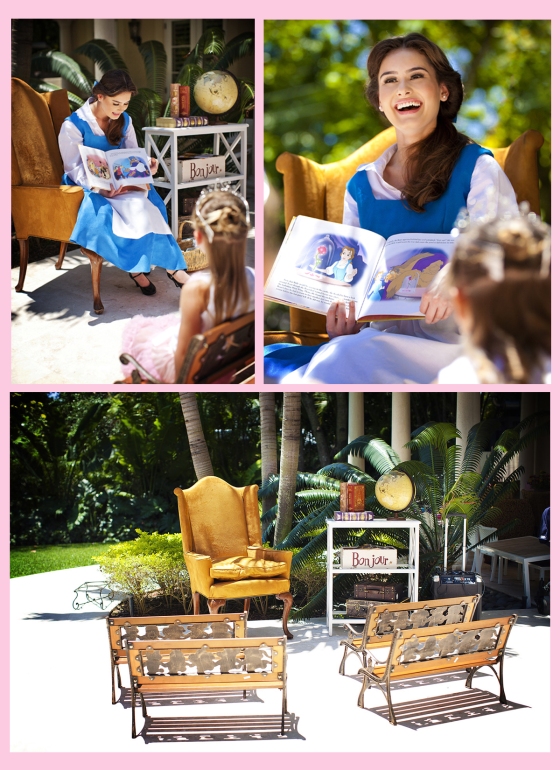
Awnings, baguettes, crepes, croissants, flower carts, and lovely French music created an ambiance that would make you want to sing! Not to mention, the most beautiful princess that came to sing and read stories to the children!

As children passed the village, they entered Princess Alexa’s Boutique. The boys would be transformed into pirates and the girls into beautiful princesses. They were handed gorgeous petti-skirts (from Mommy’s store Tutti Bambini Maternity Concierge) with matching tank tops, tiaras, and got their hair and makeup done by a fabulous Glam Squad!!!

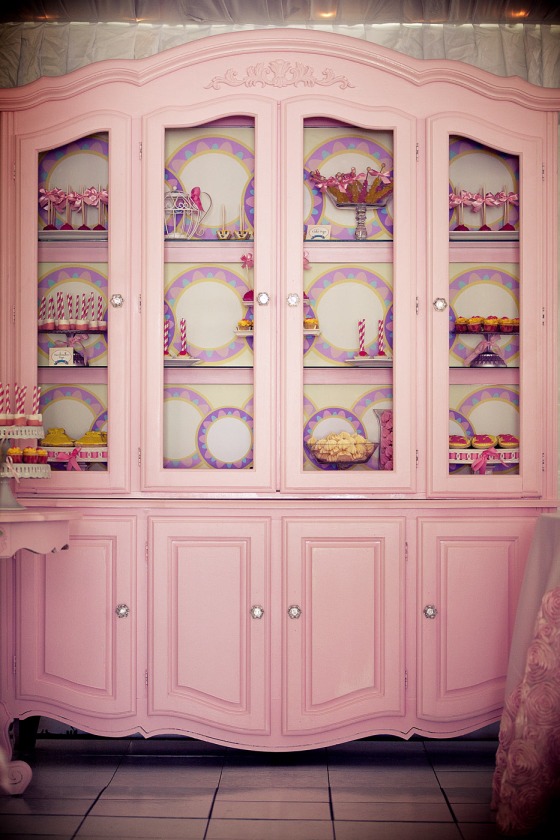
Once they were made up, the guests were greeted by wonderful princess music in the castle (tent) and they were the guests of honor! A cupboard and dining table full of treats, flowers on the table, chandeliers from the ceiling, and candelabras that added royalty were some of the details that guests encountered. This party was by far magical and so much fun to style. The best part of this party was the wonderful family I got to work with and all the fun (and stress) I had putting it together! Happy Birthday Princess Alexa! J

Major THANK YOU to all the vendors who helped make this possible and the AMAZING I Heart Sugar Sugar team!! J Special thank you to Studio One Six who captured these gorgeous images!!!

Dollhouse Paperie by Dolce Drive, Events Factory Group, Sweet Dough, Two Sweet Cakery, Sugar and Spice Miami, Studio One Six, Artex Productions, Mariel Ruiz and Montserrat, Spa Blvd Parties, Enchanted Fairytale Parties, Cake by R.C.

Above all, thank you Lourdes for allowing me to run with it and trusting me with your princess’ party! xoxo

Welcoming Damian

I have had the fortune to have great clients! I love working with them and some of them let me run free with ideas and have put their trust in me which I value so much. Jenny is one of these clients that lets me run free… 🙂 She is expecting her second baby boy at the end of April and wanted to plan a stress free baby shower. I offered to help her and we began to work on styling her intimate affair of 30 guests. What I loved most about her baby shower was the location and menu. She hosted her baby shower at Cinco Mexican Restaurant in Merrick Park. The colors are vibrant and lent itself to using a gorgeous color scheme.

We decided to go with Orange, Greens, Ivory, Brown and hints of yellow. The colors were perfectly suited for the venue and I think a perfect match for the delicious mexican food! I wanted to style the event with a rustic yet elegant look in mind. I designed the centerpieces with vibrant florals on different tree trunks as to not have so much uniformity and Landy’s flowers created exactly what I had in mind!! The orange damask used throughout the printables was one of my favorite details of the event and I love how it all flowed so well yet simple and fresh!

Enjoy! 🙂

Lilly ❤

Event Styling: I Heart Sugar Sugar

Printables: Dolce Drive

Macaroons: Crazy about Macaroons

Floral Arrangments: Landy’s Flowers

Cake: Cake Designs by Edda


Be my Valentine?

So excited to be sharing this full party post today! I have been working on a few ideas over the past few months of my new life as a mommy. I love Valentines day decor and have always wanted to host a party. This year it was a perfect opportunity! I decided to put together a small soiree in honor of all the little Valentines in my family. Right away I knew I wanted to use the foam elephants I picked up at Target as inspiration for color! I decided to use red, hot pink, lime green, and turquoise as my color scheme and went from there for design.

Immediately after I decided to do the party, I reached out to Andrea from Dolce Drive to help me out with a printable collection that would tie in great to the party. Luckily she had designed something already for her little daughter so it was perfect!

I knew I definitely wanted a Cupids Post Office where all the guests could drop off their cards and valentines they brought for the other kids. I picked up some metal tin mailboxes from Target and wrote every childs name on them so that it would be more organized when distributing all the treat and valentines. My favorite detail…the adorable Cupids Post Office sign!

Next up was the table setting where the kiddies would sit and eat their heart-shaped peanut butter and jelly sandwiches! I knew I wanted it colorful and fun to grasp the kid attention too. I used the foam elephants as individual party favors for the kids and definitely needed to use the “so nuts about you” tags from Dolce Drive..so I purchased Nutter Butter cookies and created favor bags for the kids to match the elephants. For centerpieces, I wanted to do something that would have a double use. I purchased GORGEOUS handmade flowers from my friend Elisa over at Live.Play.Love and added leaf-shaped tags with all the names of the women attending the party. At the end of the party, every child gave their special Valentine (Mommies, Aunts, Cousins, Etc.) a flower. It was a very sweet moment at the party.

Then there was the treat station…My FAVORITE part! I can’t even begin to thank everyone that helped me out with making the most delicious and beautiful treats for this party! Barbie at Two Sweet Cakery made me the perfect cake pops in lime green and pink, and as always she never fails with detail…She even added a small heart for that extra touch! Loved them! Jeanette at Sweet Dough made me the most DELICIOUS chocolate cookie which I later decorated in 10 minutes (Not too proud of them, but the taste made them much better!)..Then we had local grocery store cupcakes, mini heart-shaped gummies, peanut butter and jelly heart-shaped sandwiches, guava meringues, fruit kabobs, sixlets, and rock candy.. I’m so happy with the way the party turned out! It was so much fun! Have a Happy Valentine’s Day!!! xoxo

Thanks to my sister for the great pictures and all her help like always!!!

So NUTS about you Elephant!!

I’m so EXHAUSTED after today’s Valentine’s Day party for the little Munchkins in my family, BUT I just had to post this! Remember the tags from Dolce Drive on the So Nuts about you post? Well, Andrea so kindly designed and printed some beautiful paper goods for the party! One of my favorite details of the party were the foam Elephants that I used as inspiration for color which I paired up with Nutter Butter cookies and couldn’t have been happier! Originally, I was going to bake and decorated Peanut shaped cookies but with all the party details I had to take care of, I ran out of time!! I ran into this last box of cookies at the store and I grabbed it right away! I knew it would work…but I didn’t know it would be so PERFECT!!! I just loved how they turned out!

How cute is this?!!! Each child had their elephant and cookies and their place setting… Defintely something adorable to make for treats for any Valentine!

Best part….Dolce Drive provided a FREE printable of the tags!!! Enjoy!

So NUTS over You

Lilly ❤

Lollipop Kisses!

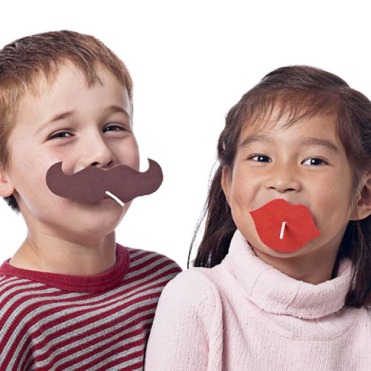
I picked up a book last week at Target about Valentine’s Day crafts. It had all kinds of cute crafts and I wanted to make them all. One of the crafts was these adorable Lollipops inserted into foam lips and mustaches. I like to call them Lollipop Kisses!! 🙂 Very simple…You’ll need: Red and Brown Craft foam, toothpick or wooden skewer, scissors/xacto knife, lollipops

  1.  draw out a mustache and some lips
  2. cut them out with either scissors or xacto knife
  3. poke a hole through the middle with a skewer or toothpick
  4. insert your lollipop through it…DONE!

You could also add some printed flags to make it more pesonal..So cute and simple!!! This craft would make great for photoprops.. 🙂

Lilly ❤Image Detail

Image Detail

Valentine’s Day Party Inspirations.. :-)

Next week I’m hosting a small Valentine’s Day party for all the small sweethearts in my family! I’m really excited because I usually work with a larger group of kids for my events and don’t have time to get ALL my ideas out because they get lost! However, this time it is only 10 little ones and I’m storming up LOTS of ideas.. 🙂 I got my inspiration from this cute little Elephant Foam Craft Kit at Target and I’m working on a color scheme now.. I can’t wait to see how it all turns out!

As always, I look for inspiration in all kinds of places and have finally gotten down to all the planning for the party! Here are some of the links I went on to find inspiration…Hope you can get some too from these wonderful sites!

How cute are the Pink Lanterns hanging! —– Hostess with the Mostess: I Heart Valentine’s Day

Loving the AWNING on this one..I’ve always wanted to make one —— Kara’s Party Ideas: Cupid’s Post Office

Beautiful Printable Collection from The TomKat Studio—– TomKat Studio

Love it all! Can’t wait to share all the details soon for our little shindig!

Lilly ❤

Shot to the heart!!!!

On Friday I posted a picture of some supplies and asked who could guess what I was going to make? I didn’t receive any replies!!!!!!! I figured it was Friday, and everyone was ready for the weekend. I reposted the question over on our fanpage on Facebook and finally got some good guesses. Some people were very close and a couple were right on the mark! The supplies consisted of A pixy stix, 2 heart shaped chocolates, and a small craft foam heart…The result…. Cupid’s Arrow!!!

There are several ways you can use this arrow for Valentine’s Day. You can simply make the arrow and incorporate it into:

  • Treat Bags/Boxes
  • Treat stations
  • Attach to a Card
  • Attach personalized tag to the arrow

I decided to make a little Heart shaped card for my arrow…If you choose to do something like this, make sure you take a glimpse at the next few pictures because otherwise you will get stuck making your arrow all over again (Trust me, from personal experience!)

I first drew out a heart on pink cardstock paper about 4″x4″ and cut it out. Then I used an EXACTO Knife to cut two slits through the heart on opposite diagonal sides to fit my arrow through. With a Silver Sharpie marker, I wrote Happy Valentine’s Day. I took the pixy stix and slid it through the heart until it was postioned evenly. Using a Low Temp gluegun, I glued a tiny drop on the bottom of the piy stix and attached the foam heart. Then using 2 small glue dabs on the foil part on the back of the chocolate heart, I attached it to the pixy stix…And Voila! Isn’t it so cute!?

Sorry the Picture is bad!

You could always write on the back of the card or just make this as part of card or even write just the person’s name on the heart. If you want to use this craft at a party…It would be perfect as a placecard! 🙂

Lilly ❤

Heart Envelopes

Target’s $1 Section HAS to be one of my favorite places to go! They always have the cutest seasonal items and containers! Last week, I found a few things that I will be using for my upcoming Mini Valentine’s Day Party.. 😉 One of the seasonal items I found that I just loved was this pack of hearts that you fold into envelopes. Not only can you use them for Valentine’s day, but you can buy different kinds of cardstock and make birthday envelopes custom to a theme, or for a wedding, etc.

The only thing lacking in this kit was a tip on how to make sure you folded the lines correctly and at the right length. I used a cardstock to line up the heart and make sure my folds and creases were nice and straight…Here’s a quick step by step guide I did to help out.. 🙂

Can you guess?????

So I promised I would have two posts yesterday with ideas for Valentine’s Day but I couldn’t get around to the Second Post! Sorry! It was for good reason I promise! I was out gathering more supplies and inspiratation for the next 2 weeks before Valentine’s Day. For now, here is a little question to see how good of a guesser you all are… 🙂

Can you guess what I’m going to make with these supplies??!!!! If you think you have the answer, comment below..